Appearance
Bitbucket Pull Request Dashboard
This example demonstrates how to create a dashboard component that displays the information of all open Pull Requests from Bitbucket repositories associated with a Jira project.
High-Level Overview
We're going to create a dashboard that receives events from Bitbucket whenever a Pull Request is created, updated, merged, or declined. The dashboard will display the information of all open Pull Requests from Bitbucket repositories associated with a Jira project.
To achieve this we'll use:
- Webhooks from the Bitbucket repository to get data into our dashboard.
- Some Webhook Transforms to convert the native Bitbucket Webhook events into the structure we want to display.
- A Data List to store and manage the Pull Request data.
- A Dynamic Table to display the Pull Request data inside the Jira project.
Getting data from Bitbucket
The dashboard we're creating needs to receive and store two events from Bitbucket:
- Whenever a Pull Request is Created or Updated.
- Whenever a Pull Request is Merged or Declined.
Creating Webhook Transforms
Before we set up the Webhooks in Bitbucket, we need to create the Webhook Transforms that will convert the Bitbucket Webhook events into the structure we want to display in the dashboard.
We need to do this first so that we know the Webhook Transform URL's to use when setting up the Webhooks in Bitbucket.
Pull Request Created or Updated
The first Webhook Transform we'll create is for whenever a Pull Request is Created or Updated.
Because the payload sent from Bitbucket is the same for both events, and App Maker's Data List functionality automatically handles both "create" and "update" operations, we can just create a single Webhook Transform for both.
TIP
Feel free to copy/paste the JSON below for your own use-cases, and then modify the source and target values as needed.
Just make sure to replace the resourceKey with a project key that matches the project you want to display the data in.
Pull Request Updated Webhook Transform
json
{
  "action": "set",
  "resourceType": "site",
  "title": "bitbucket-pr-updated",
  "transformTarget": "data-list",
  "transformData": {
    "action": "add",
    "resourceType": "project",
    "resourceKey": "AMT",
    "title": "bitbucket-prs",
    "listItemKey": "id",
    "listItem": {
      "id": "{{webhook.body.pullrequest.id}}",
      "title": "{{webhook.body.pullrequest.title}}",
      "author": "{{webhook.body.pullrequest.author.display_name}}",
      "status": "{{webhook.body.pullrequest.state}}",
      "link": "{{webhook.body.pullrequest.links.html.href}}",
      "commentCount": "{{webhook.body.pullrequest.comment_count}}",
      "taskCount": "{{webhook.body.pullrequest.task_count}}",
      "repoName": "{{webhook.body.repository.full_name}}",
      "repoLink": "{{webhook.body.repository.links.html.href}}"
    }
  }
}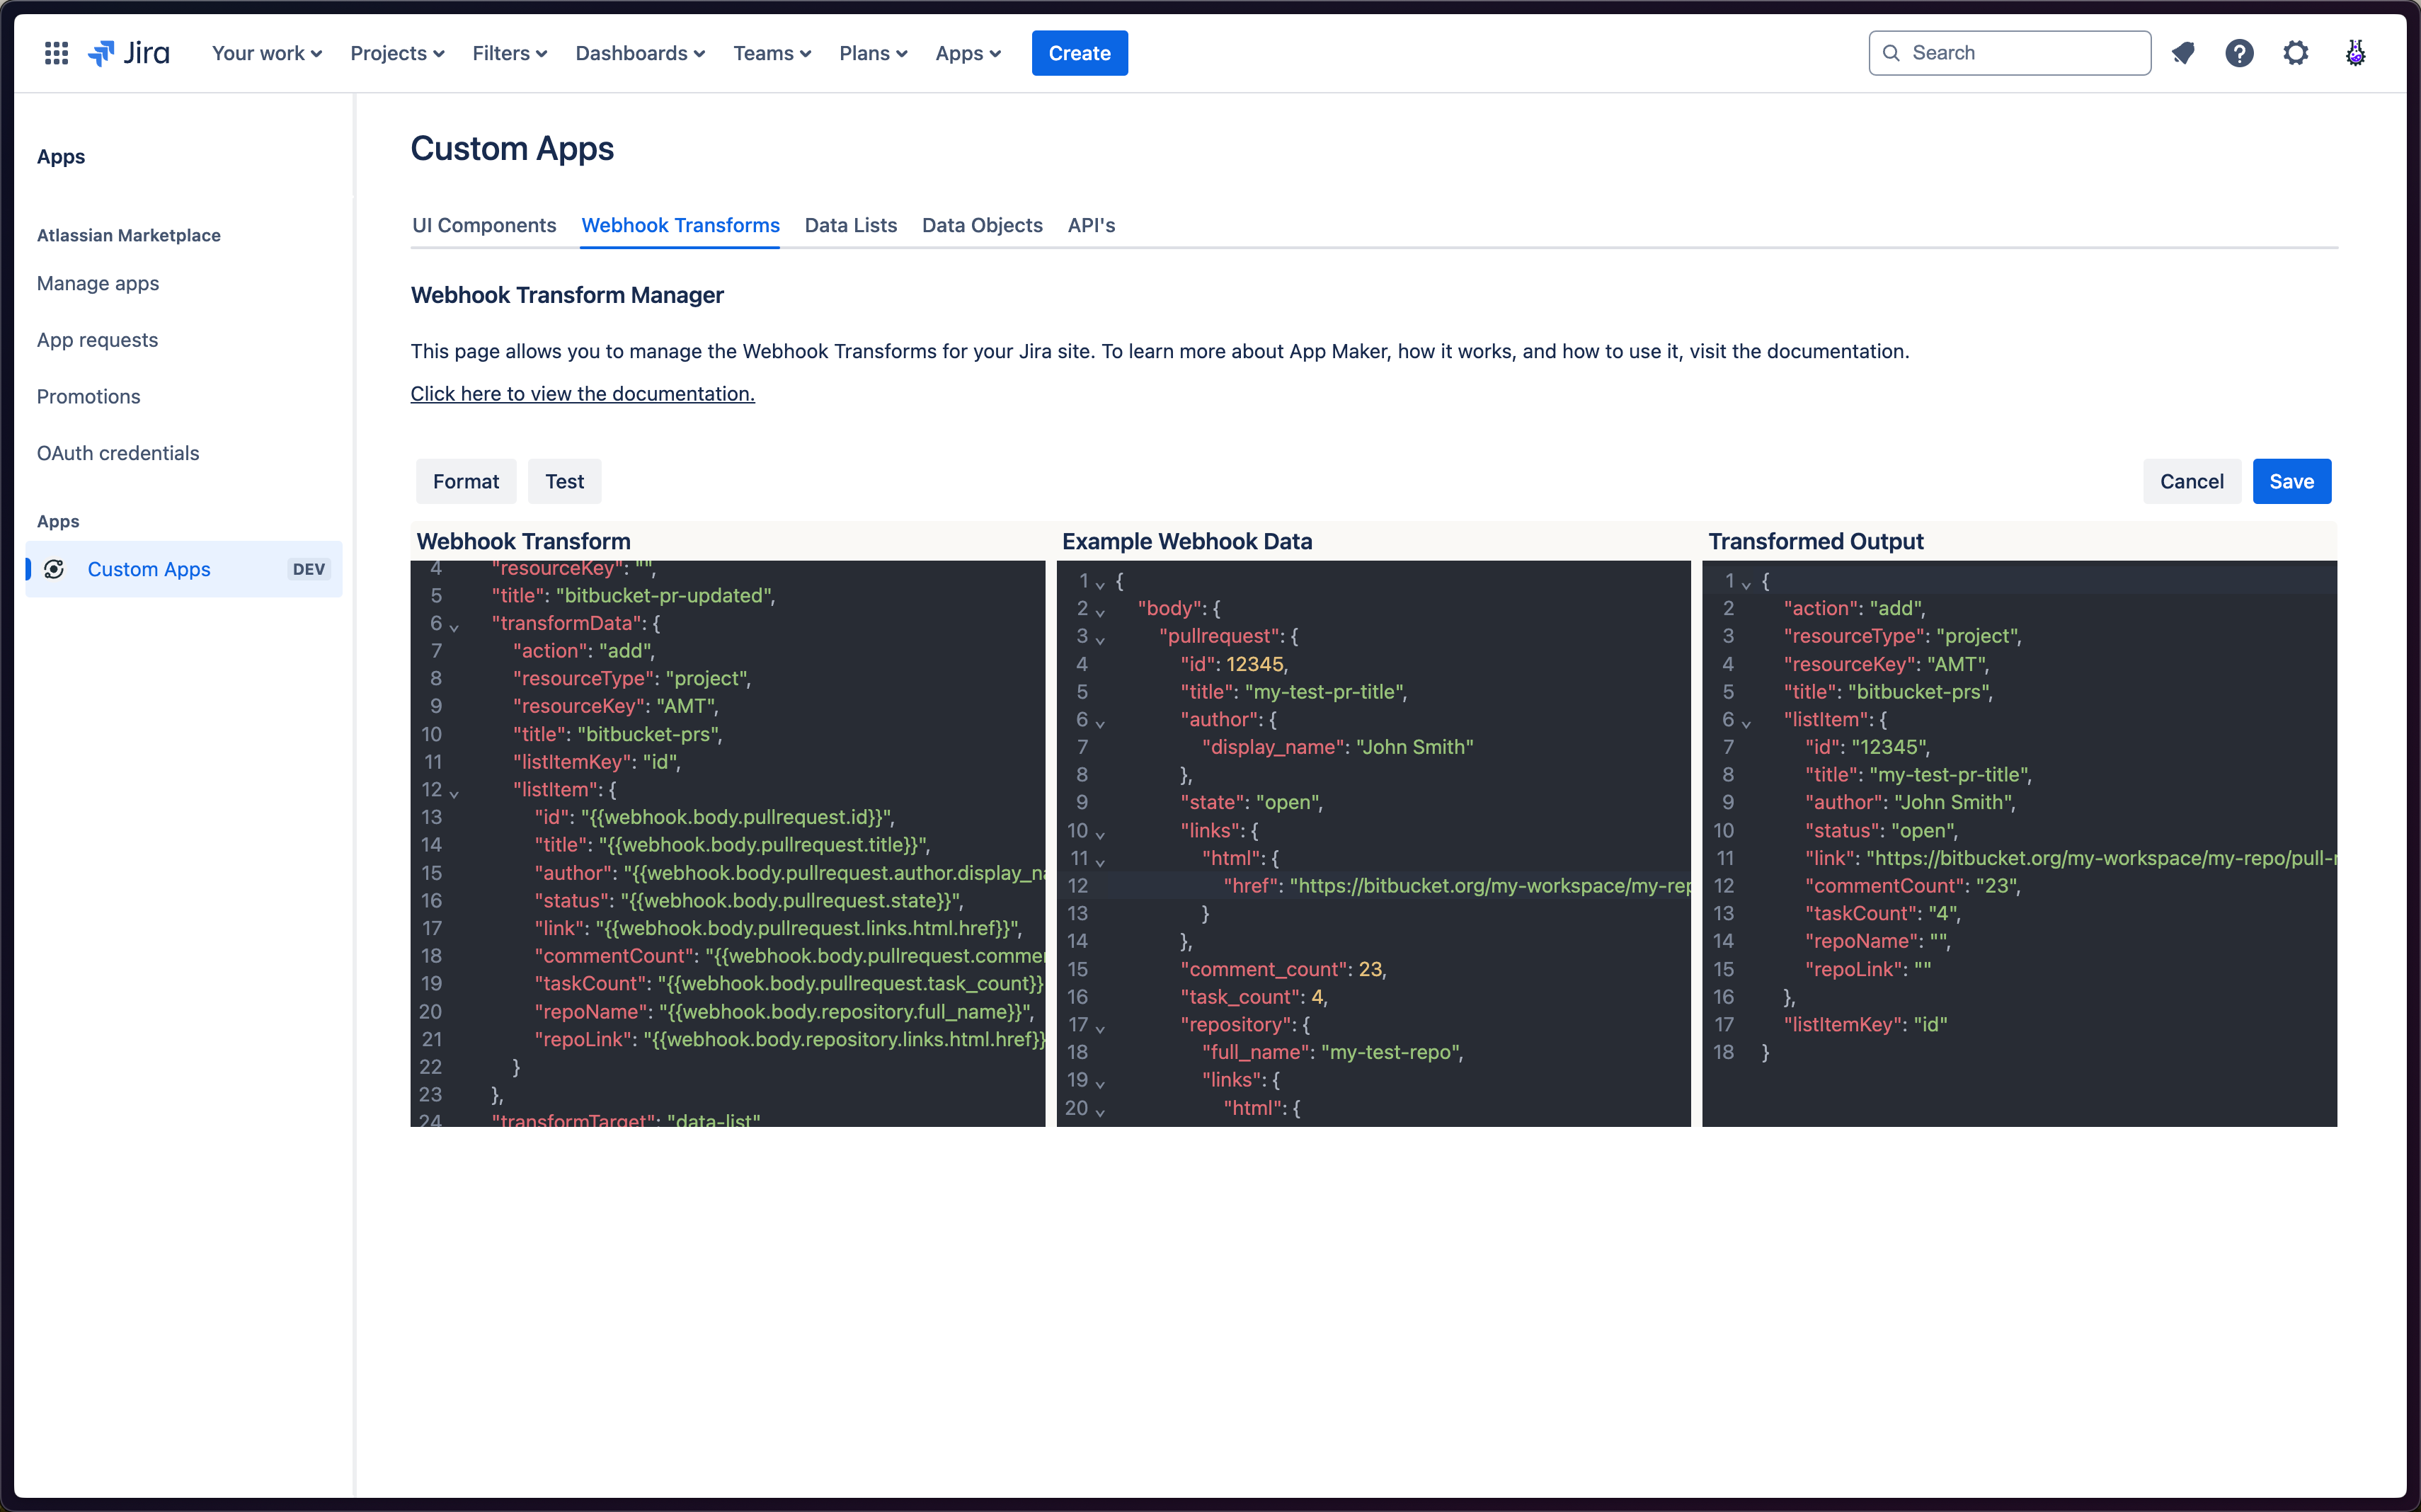
Above we create a Webhook Transform that:
- Is scoped to the
siteresource type. - Has a title of
bitbucket-pr-updated. - Has a
transformTargetofdata-list, so that we know we want to store the data in a List, rather than in a single Data Object.- This is important because we want to store multiple Pull Requests in the same List, and then display each of them separately in a table.
What that Webhook Transform does is defined inside the transformData object:
- We set the
actionfield to'add', so that the List knows to add a new item each time this transform runs. - We set the
resourceTypefield to'project', so that the list being operated on is scoped to a project. - We set the
resourceKeyfield to'AMT', so that the list being operated on is scoped to the project with the key'AMT'. - We set the
titlefield to'bitbucket-prs', so that we can specify exactly which list within that scope we want to operate on. - We set the
listItemKeyfield to'id', so that the List knows which field in each list item to use as the unique identifier. - Finally, we map a whole heap of fields from the Bitbucket Webhook payload to the fields we want to store in the List.
How this works:
Once created, App Maker will create a Webhook Transform URL that we can use when setting up the Webhook for the created/updated event in Bitbucket (grab the URL from the Webhook Transform Tab in the App Maker Settings area).
So what will happen is that whenever a Pull Request is created or updated, the Webhook Transform will add a new item to the specified list with all the relevant information from the Bitbucket Webhook payload.
Because the id field is used as the unique identifier, if the same Pull Request is updated multiple times, the List will only store the latest version of the Pull Request.
Pull Request Merged or Declined
The second Webhook Transform we'll create is for whenever a Pull Request is Merged or Declined.
Whenever either of these events happen, we want to remove the Pull Request from the List of open Pull Requests.
Pull Request Closed Webhook Transform
json
{
	"action": "set",
	"resourceType": "site",
	"title": "bitbucket-pr-closed",
	"transformTarget": "data-list",
	"transformData": {
      "action": "remove",
        "resourceType": "project",
        "resourceKey": "AMT",
        "title": "bitbucket-prs",
        "listItemKey": "id",
        "listItem": {
          "id": "{{webhook.body.pullrequest.id}}"
        }
	}
}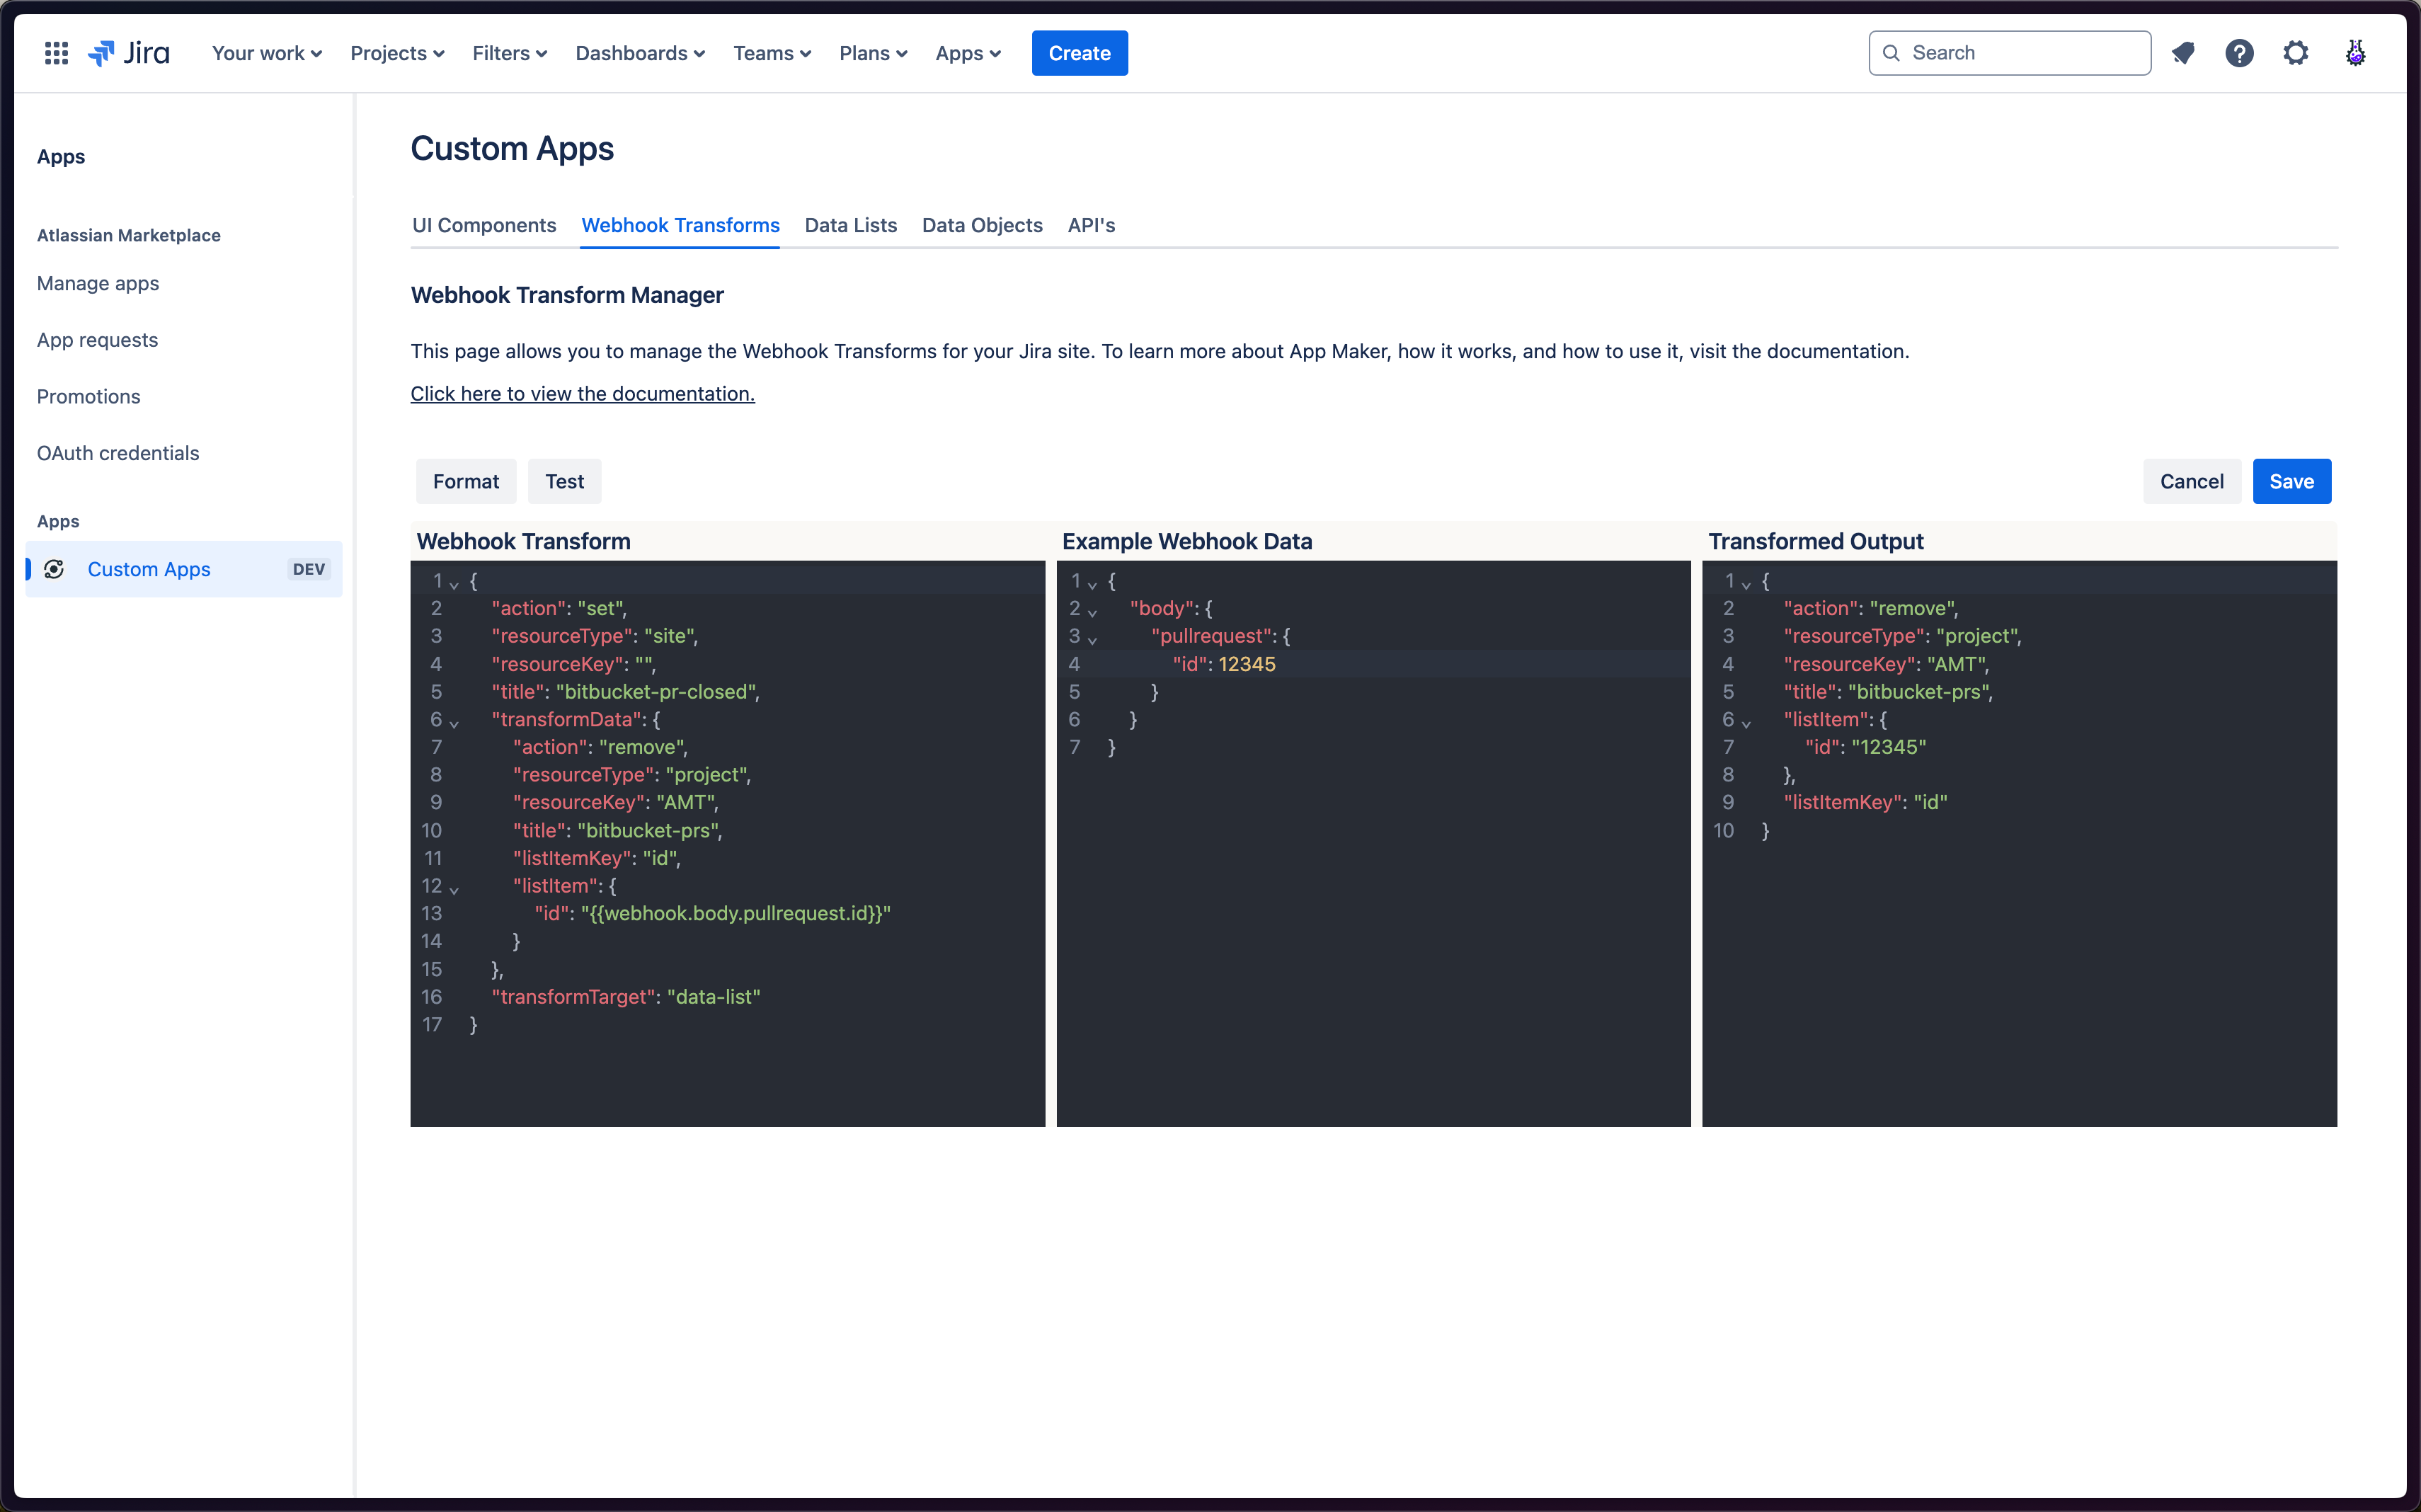
Above we create a Webhook Transform that:
- Is scoped to the
siteresource type. - Has a title of
bitbucket-pr-closed. - Has a
transformTargetofdata-list.
What that Webhook Transform does is defined inside the transformData object:
- We set the
actionfield to'remove', so that the List knows to remove an item from the list each time this transform runs. - We set the
resourceTypefield to'project', so that the list being operated on is scoped to a project. - We set the
resourceKeyfield to'AMT', so that the list being operated on is scoped to the project with the key'AMT'. - We set the
titlefield to'bitbucket-prs', so that we can specify exactly which list within that scope we want to operate on. - We set the
listItemKeyfield to'id', so that the List knows which field in each list item to use as the unique identifier. - Finally, we specify the exact field in the Bitbucket Webhook payload that represents the Pull Request ID, so that the List knows which item to remove.
How this works:
Once created, App Maker will create a Webhook Transform URL that we can use when setting up the Webhook for the merged/declined event in Bitbucket (grab the URL from the Webhook Transform Tab in the App Maker Settings area).
So what will happen is that whenever a Pull Request is merged or declined, the Webhook Transform will find the item in the specified list with an id property matching the PR, and remove it from the List of open Pull Requests.
Setting up Webhooks in Bitbucket
Now that we have our Webhook Transforms set up, and we have URL's for each of them, we can go ahead and set up the Webhooks in Bitbucket. This example doesn't cover how to set up Webhooks in Bitbucket in detail, but you can find the official Bitbucket documentation here.
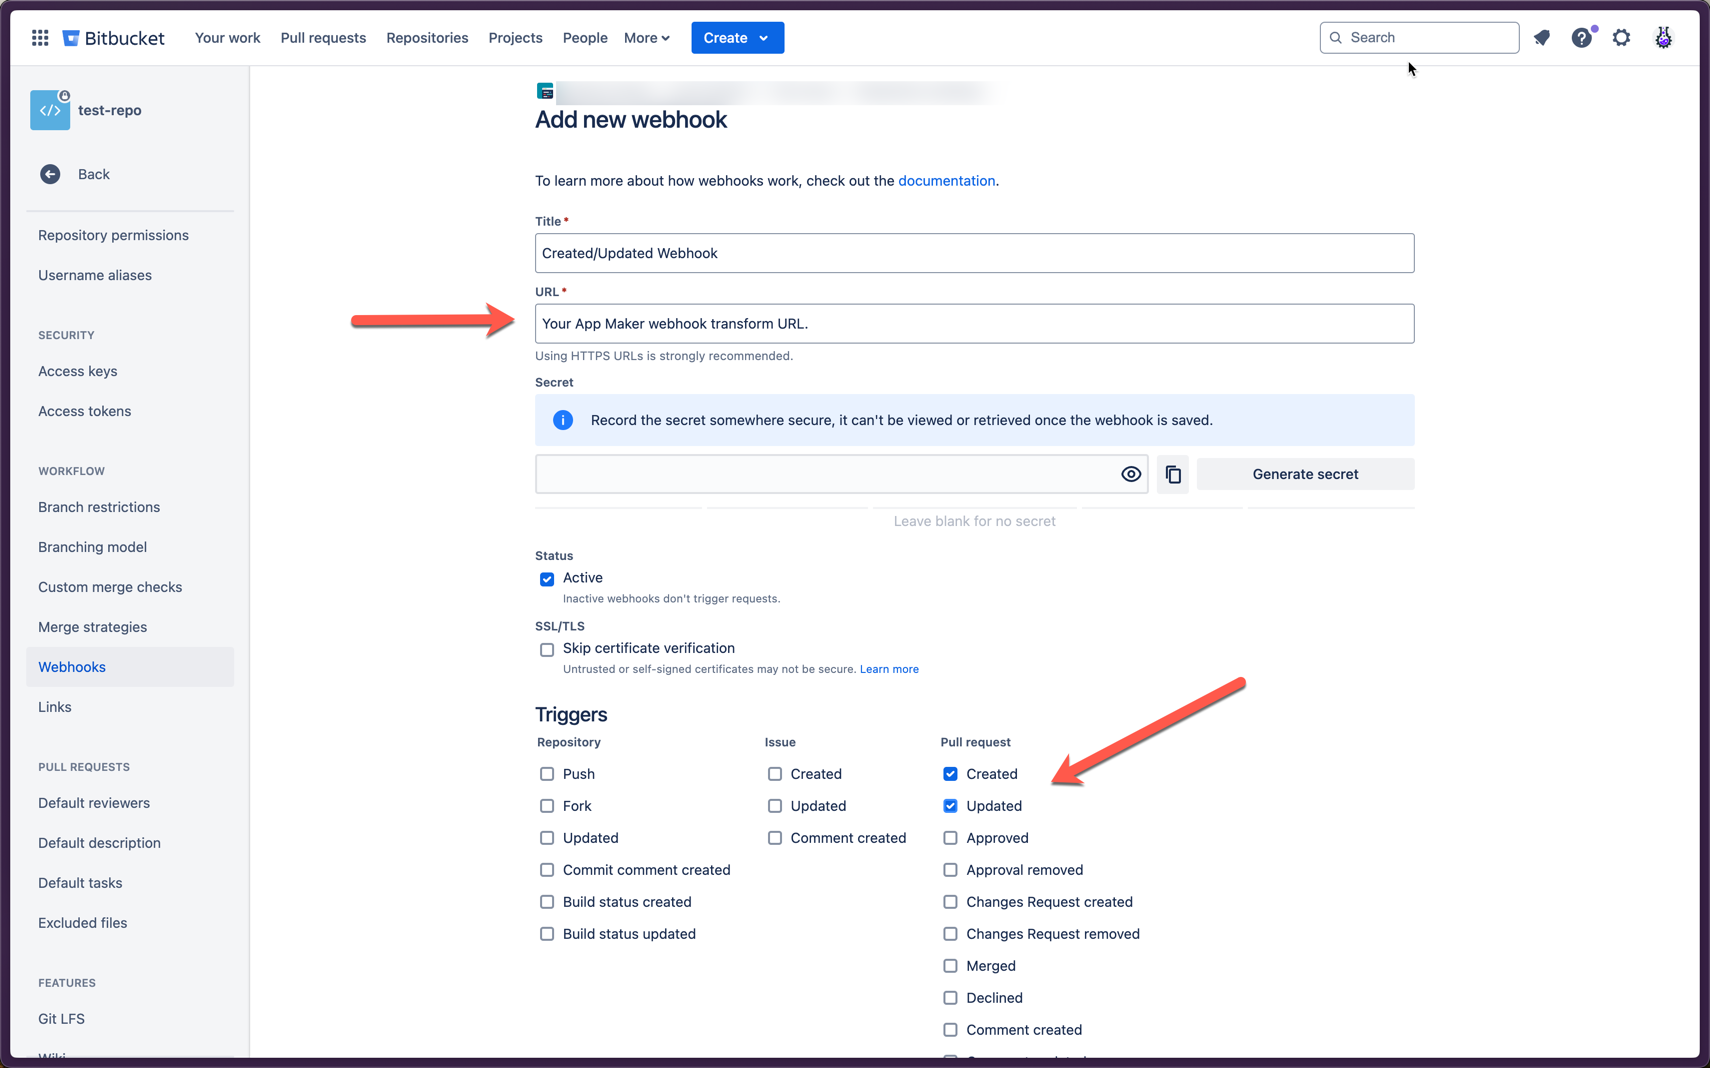
You will need to create two separate Webhooks, one that fires on PR's being created or updated, and one that fires on PR's being merged or declined.
When setting up the Webhooks, you will need to provide the URL's for the respective Webhook Transforms you created earlier.
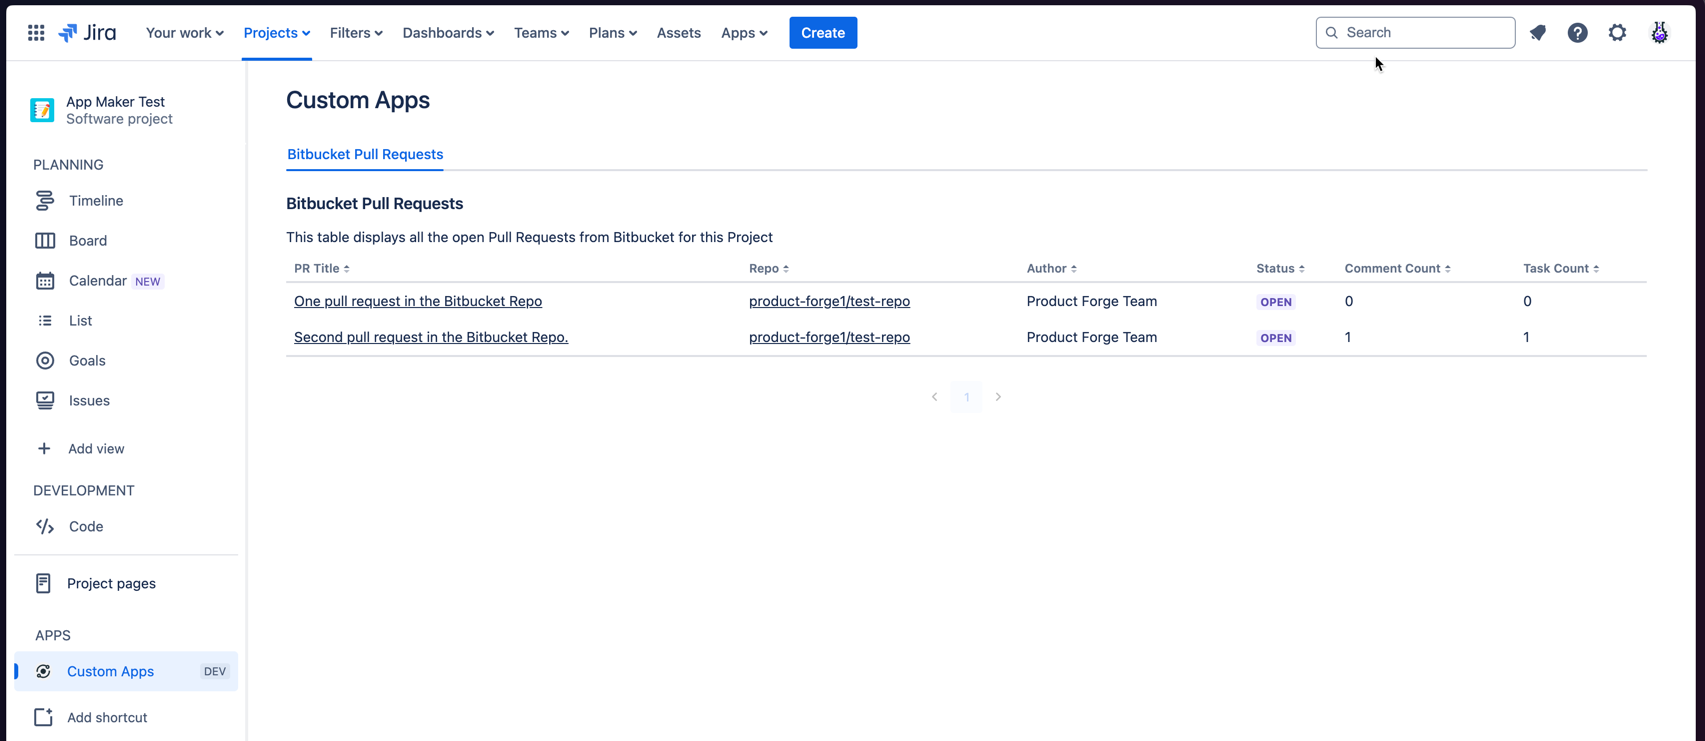
Creating the dashboard in Jira
At this stage you should now have Webhooks set up in Bitbucket that send data to the Webhook Transforms in App Maker. These Webhook transforms will store and manage the data in a List within App Maker that we can then display in the UI.
The last step of the process is creating the dashboard in Jira that displays the list of all the open PR's for users to be able to access.
Bitbucket Pull Request List UI Component
json
{
	"action": "set",
	"resourceType": "project",
	"resourceKey": "AMT",
	"title": "pr-table",
	"module": "jira:projectPage",
	"componentData": {
		"type": "TabPanel",
		"tabTitle": "Bitbucket Pull Requests",
		"children": [
			{
				"type": "FullPageSection",
				"title": "Bitbucket Pull Requests",
				"children": [
					{
						"type": "ParagraphMedium",
						"content": "This table displays all the open Pull Requests from Bitbucket for this Project"
					},
					{
						"type": "DynamicTable",
						"columnHeaders": [
							{
								"type": "TableHeader",
								"title": "PR Title",
								"valuePath": "title",
								"linkPath": "link"
							},
							{
								"type": "TableHeader",
								"title": "Repo",
								"valuePath": "repoName",
								"linkPath": "repoLink"
							},
							{
								"type": "TableHeader",
								"title": "Author",
								"valuePath": "author"
							},
							{
								"type": "TableHeader",
								"title": "Status",
								"valuePath": "status",
								"fieldType": "lozenge",
								"appearanceMap": {
									"discovery": [
										"Open",
										"open",
										"OPEN"
									],
									"success": [
										"Closed",
										"closed"
									]
								}
							},
							{
								"type": "TableHeader",
								"title": "Comment Count",
								"valuePath": "commentCount"
							},
							{
								"type": "TableHeader",
								"title": "Task Count",
								"valuePath": "taskCount"
							}
						],
						"tableRows": "{{list: lists.project.bitbucket-prs}}"
					}
				]
			}
		]
	}
}
The JSON above will create the following:
- A new UI Component.
- Scoped to the same project as the Data List storing the PR data (AMT).
- With a title of
pr-table. - And displaying in the
jira:projectPagemodule.- This module creates a new full-page tab in the project sidebar.
Inside that UI Component we have:
- A
TabPanelcomponent (required as the top-level component in most modules).- With a title of
Bitbucket Pull Requests.
- With a title of
- A
FullPageSectioncomponent.- With a title of
Bitbucket Pull Requests.
- With a title of
- A
ParagraphMediumcomponent with some introductory text. - And a
DynamicTablecomponent.- With a list of
columnHeadersthat define the columns in the table. - And a
tableRowsproperty that specifies we want to use the list we created earlier as the data for the table (lists.project.bitbucket-prs).
- With a list of
Final Steps:
Go ahead and create that UI Component in your Jira site (making sure that you use a Project key that matches the one you used in the Webhook Transforms).
Then navigate to the project you created the UI Component in. You should see an option in the sidebar called "Custom Apps", and if you open that, a tab labelled Bitbucket Pull Requests.
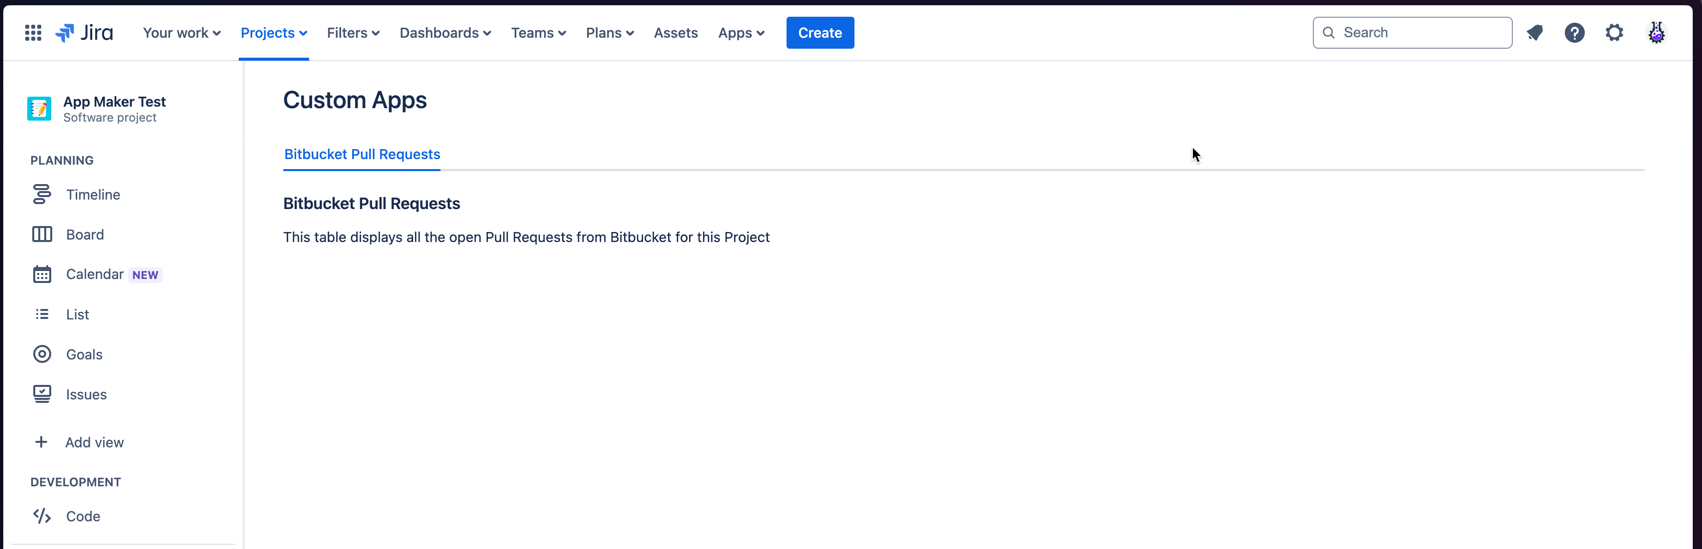
BUT... you won't see any data in the table yet, because we haven't actually created any Pull Requests in Bitbucket, and App Maker can only see data that was sent to it AFTER the Webhook Transforms were created.
To resolve this, simply head over to Bitbucket and create a PR (or push code to an existing one) and you should see the data appear in the table.