Appearance
Webhook Transforms
You may have noticed that there is one key limitation with the Data Object/List features that prevents them from being a fully end-to-end solution for sharing data from external systems to your Apps in Jira.
Data Objects/Lists are a great tools for storing data in a way that can be easily consumed by your apps, but it requires the data be sent to App Maker in a specific format/shape - and obviously your external systems won't be using that format/shape to send data when they fire Webhooks.
You could use something like Automation for Jira to translation the data into the shape you need, but that's a lot of complexity and work we don't want to have to manage.
This is where the final piece of the App Maker puzzle comes in - Webhook Transforms.
Summary
Webhook Transforms are a powerful tool that allow you to simply aim webhooks from your external systems at a URL on your Jira site, and have App Maker automatically translate the data from that webhook into the shape you need and store it in a Data Object/List.
Overview:
- Webhook Transforms are managed very similarly to Data Objects/Lists.
- They are defined as JSON, and share a very similar structure.
- Each Webhook Transform contains a
transformDataobject which allows you to map data from a webhook you receive and store it in a Data Object/List. - When you create a Webhook Transform, it will generate a unique URL on your Jira site that you will aim your external system's webhooks at.
- When a webhook request is received at that URL, App Maker will automatically translate the data from the webhook and store it in a Data Object/List in your Jira site, ready to be displayed inside your Apps.
Example Workflow:
We're going to create a Webhook Transform that will receive a webhook from an external system monitoring the status of our website and API, and store that data in a Data Object for use in a System Status widget in Jira.
What You Will Need
Creating the Webhook Transform
- Head back to the App Admin page in your Jira site by clicking the cog icon in the top right corner of the screen and selecting "Apps" from the dropdown, then select "Custom Apps" in the sidebar, and click on the "Webhook Transforms" tab.
- Click "New" in the bottom-right to start creating a new Webhook Transform.
Webhook Transform Editor
Webhook Transform Editor
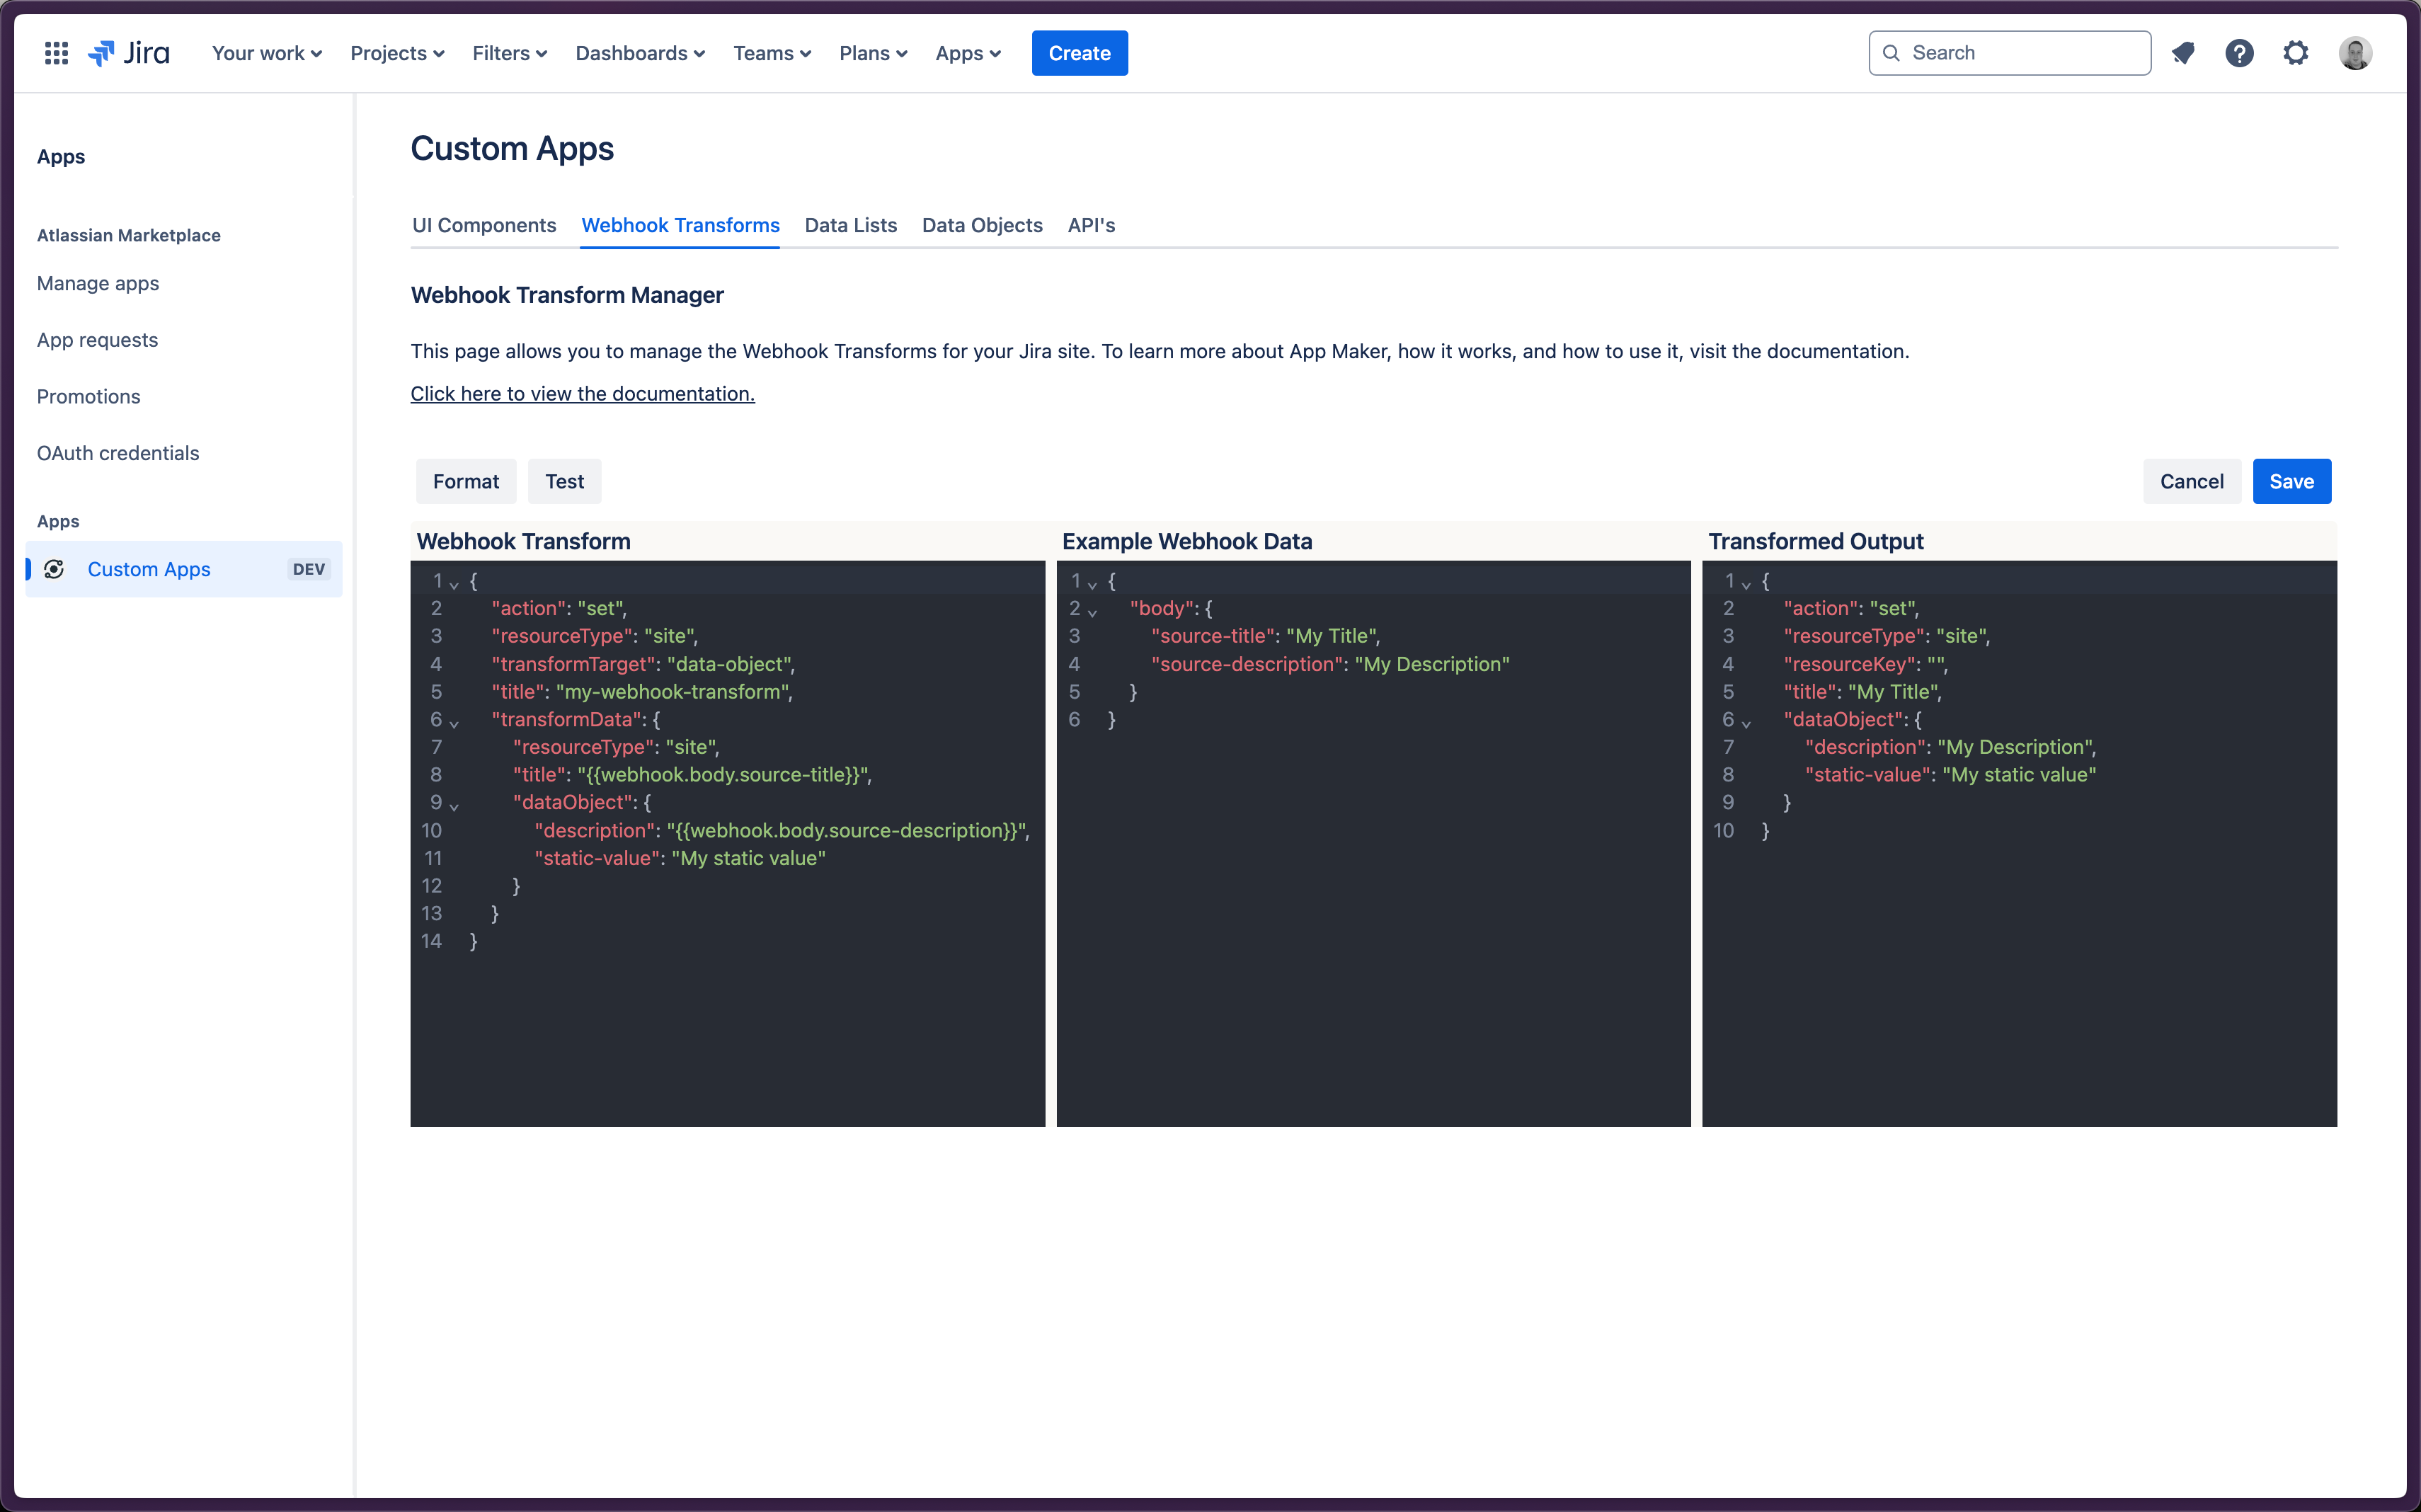
- The Webhook Transform editor is similar to those for Data Objects/Lists, but with a few key differences.
- Webhook Transforms are designed to be used to modify an incoming webhook payload so that it can be translated into a Data Object or Data List item.
- To make this easier, the Webhook Transform editor allows you to define an example webhook payload and then run an in-editor test of the Webhook Transform to see exactly what the final output would be, based on that example payload and the webhook transform you define.
- This makes it easy to see how your transform will affect the data you receive from your external system and make changes to your Webhook Transforms without having to affect workflows currently being used in your Apps.
Example Webhook Data
- For the sake of the example, assume a webhook payload for a status change event from an app monitoring tool that looks like the JSON below, sent to a Webhook Transform URL that includes the query parameter
project=ABC.
What's a "Query Parameter"?
- Query parameters are a way to include additional data in a URL that can be used by the system receiving the request.
- They are particularly useful Webhook Transforms because they allow you, the person creating the Webhook Transform, to specify some static values that you always want to be included in your Webhook Payload, no matter what the system sending the webhook includes.
- This allows you to do things like reuse a single Webhook Transform for multiple different use-cases rather than having to create a new one for each use-case, just by changing the query parameters you include in the URL you point your external system's webhooks at.
- Query parameters are included in a URL by adding a
?to the end of the URL, followed by the query parameter name, an=, and the value you want to include.- So if you wanted to include a persons name in a query parameter, you might include
?name=Johnat the end of the URL.
- So if you wanted to include a persons name in a query parameter, you might include
- Multiple query parameters can be included in a URL by separating them with an
&.- e.g.
https://some-url.com?first-name=john&last-name=smith
- e.g.
Example webhook payload
json
{
  "event": {
    "status-checks": {
      "website": "Offline",
      "api": "Online"
    }
  }
}- When App Maker receives that webhook at the specified URL, it will extract the data from the body of the webhook + any query parameters and make it available for you to use in your Webhook Transform, as shown below.
- You might notice that the two top-level fields in the example payload are
bodyandqueryParams. - The
bodyfield contains the JSON payload of the webhook, and thequeryParamsfield contains any query parameters that were included in the URL the webhook was sent to. - App Maker implements this structure because URL query parameters are often used to scope/route the data being sent in a webhook to a specific project or issue in Jira and can easily be specified when creating webhooks in external systems by including them in the URL the webhook is sent to.
- You might notice that the two top-level fields in the example payload are
Example Webhook Transform data context
json
{
  "body": {
    "event": {
      "status-checks": {
        "website": "Offline",
        "api": "Online"
      }
    }
  },
  "queryParams": {
    "project": "ABC"
  }
}- In the centre editor window ("Example Webhook Data"), paste the example webhook data shown above.
Example Webhook Data Editor

Webhook Transform JSON:
- In the left-hand editor window, add the following JSON:
Webhook Transform Wrapper
json
{
  "action": "set",
  "resourceType": "site",
  "title": "my-first-webhook-transform",
  "transformTarget": "data-object",
  "transformData": {
    ...
  }
}- You'll notice that most of the top-level fields are very familiar;
action,resourceType, andtitleare all the same as they were for Data Objects and UI Components. - The main difference for Webhook Transforms is that they can (currently) only be created at the
sitelevel, so theresourceTypeshould always be"site"and thetitleshould be unique to your site.- Note that although Webhook Transforms themselves can only be created at the
sitelevel, they can be used to create other entities at any level in the hierarchy.
- Note that although Webhook Transforms themselves can only be created at the
- Additionally, Webhook Transforms must specify a
transformTargetwhich tells App Maker whether the data being transformed should be stored as a Data Object or an item in a Data List.- The two options for this property are
"data-object"and"data-list".
- The two options for this property are
Important Note
- Webhook Transforms can also be used to manage data in a Data List in the same way they can be used to manage data in a Data Object.
- This is particularly important for situations where you want to track all the data from a particular external system, rather than just the most recent piece of data that changed.
- We'll cover Data Lists in the next section, but for now, we'll focus on Data Objects.
Transform Data:
- Now, we want to map the data from the Webhook so that it can be used in the System Status widget we created in the guide for Data Objects.
- The
transformDataobject is where you define the actual data mappings for your Webhook Transform.
- This utilises the same Templating syntax we covered earlier to allow you to map data from the webhook payload to fields in a Data Object/List update.
- For example, in our case we want to map the
projectproperty from the query parameters to theresourceKeyfield in the Data Object, and thewebsiteandapiproperties from the webhook payload to thewebsiteandapifields in the Data Object. - Copy the JSON below into the
transformDataobject in the Webhook Transform JSON.
Heads Up:
So that you can make the mapping entirely dynamic (including things like the title, resourceType, resourceKey, etc), all fields on the entity being modified are mapped as part of the Webhook Transform.
This means that required fields like action, resourceType, & title must be explicitly mapped in the transformData object.
Webhook Transform Transform Data
json
{
  "action": "set",
  "resourceType": "site",
  "title": "my-first-webhook-transform",
  "transformTarget": "data-object",
  "transformData": {
    "action": "set",
    "title": "system_status",
    "resourceType": "project",
    "resourceKey": "{{webhook.queryParams.project}}",
    "dataObject": {
      "website": "{{webhook.body.event.status_checks.website}}",
      "api": "{{webhook.body.event.status_checks.api}}"
    }
  }
}- Whenever you are templating data via a Webhook Transform, the path you specify should assume the same top-level object as you would when templating UI Components, with top-level
jiraSite,jiraProject, &jiraIssueobjects.- This allows you to access any data already stored in your App Maker instance when executing Webhook Transforms such as Data Objects or Data Lists.
- This is an extremely powerful feature as it allows you to combine data from multiple sources and over multiple different workflows in your Jira instance to create a single, unified view of your data.
- However, when templating with a Webhook Transform there is an extra top-level object that you can access called
webhookwhich contains the two objects mentioned previously -body&queryParams.
Testing The Transform:
- Now that you've got your example webhook payload, and you've specified how you want your Webhook Transform to work, it's time to test it.
- Simply click the "Test" button in the top-left of the editor to run the test.
- You should see a response in the right-hand editor window ("Transformed Output") showing the Data Object update that would be executed if the Webhook Transform was live.
- The response should mirror the shape you would use if you were updating a Data Object via the API, as covered in the Data Objects guide.
- Your transformed output should look like this:
Transformed Output
json
{
  "action": "set",
  "resourceType": "project",
  "resourceKey": "ABC",
  "title": "system_status",
  "dataObject": {
    "website": "Offline",
    "api": "Online"
  }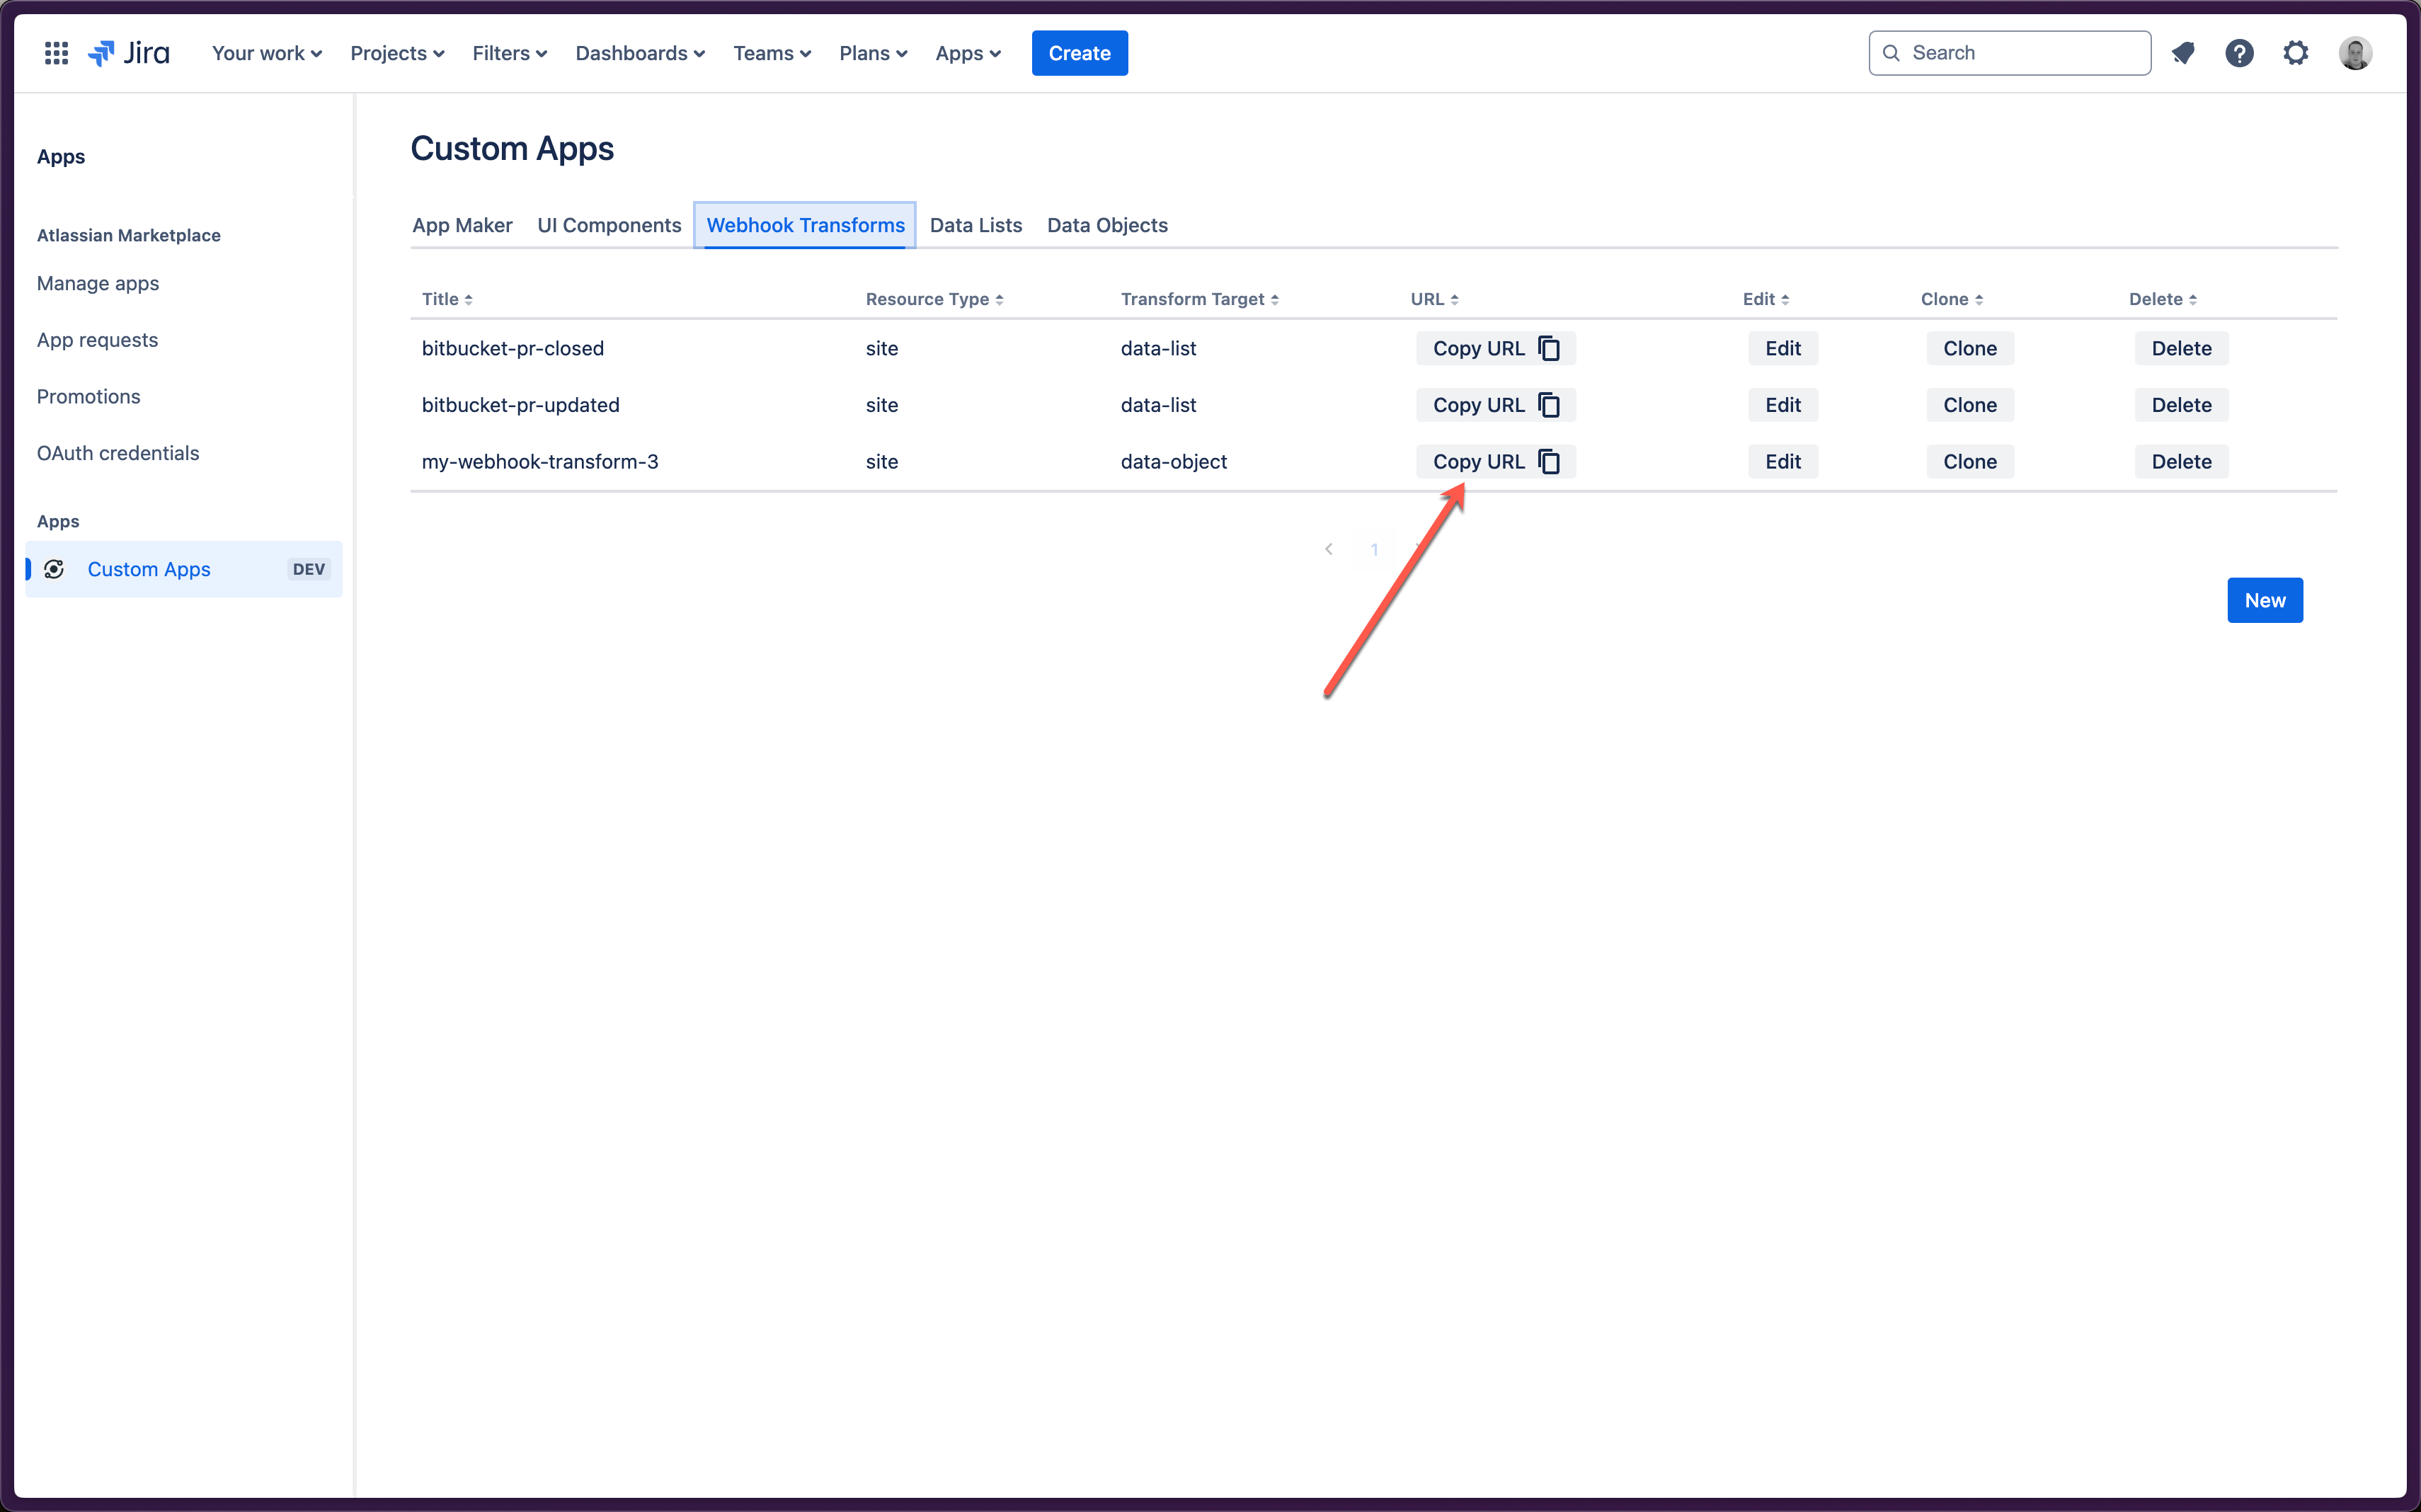
}- Hit "Save" and the Webhook Transform will be created in App Maker and you'll be sent back to the Webhook Transform list.
- Find the Webhook Transform you just created and note the "Copy URL" button in the table.
- Clicking this button will copy the URL you will point your external system's webhooks at to send data to your Jira site via this Webhook Transform.
Copy Webhook Transform URL
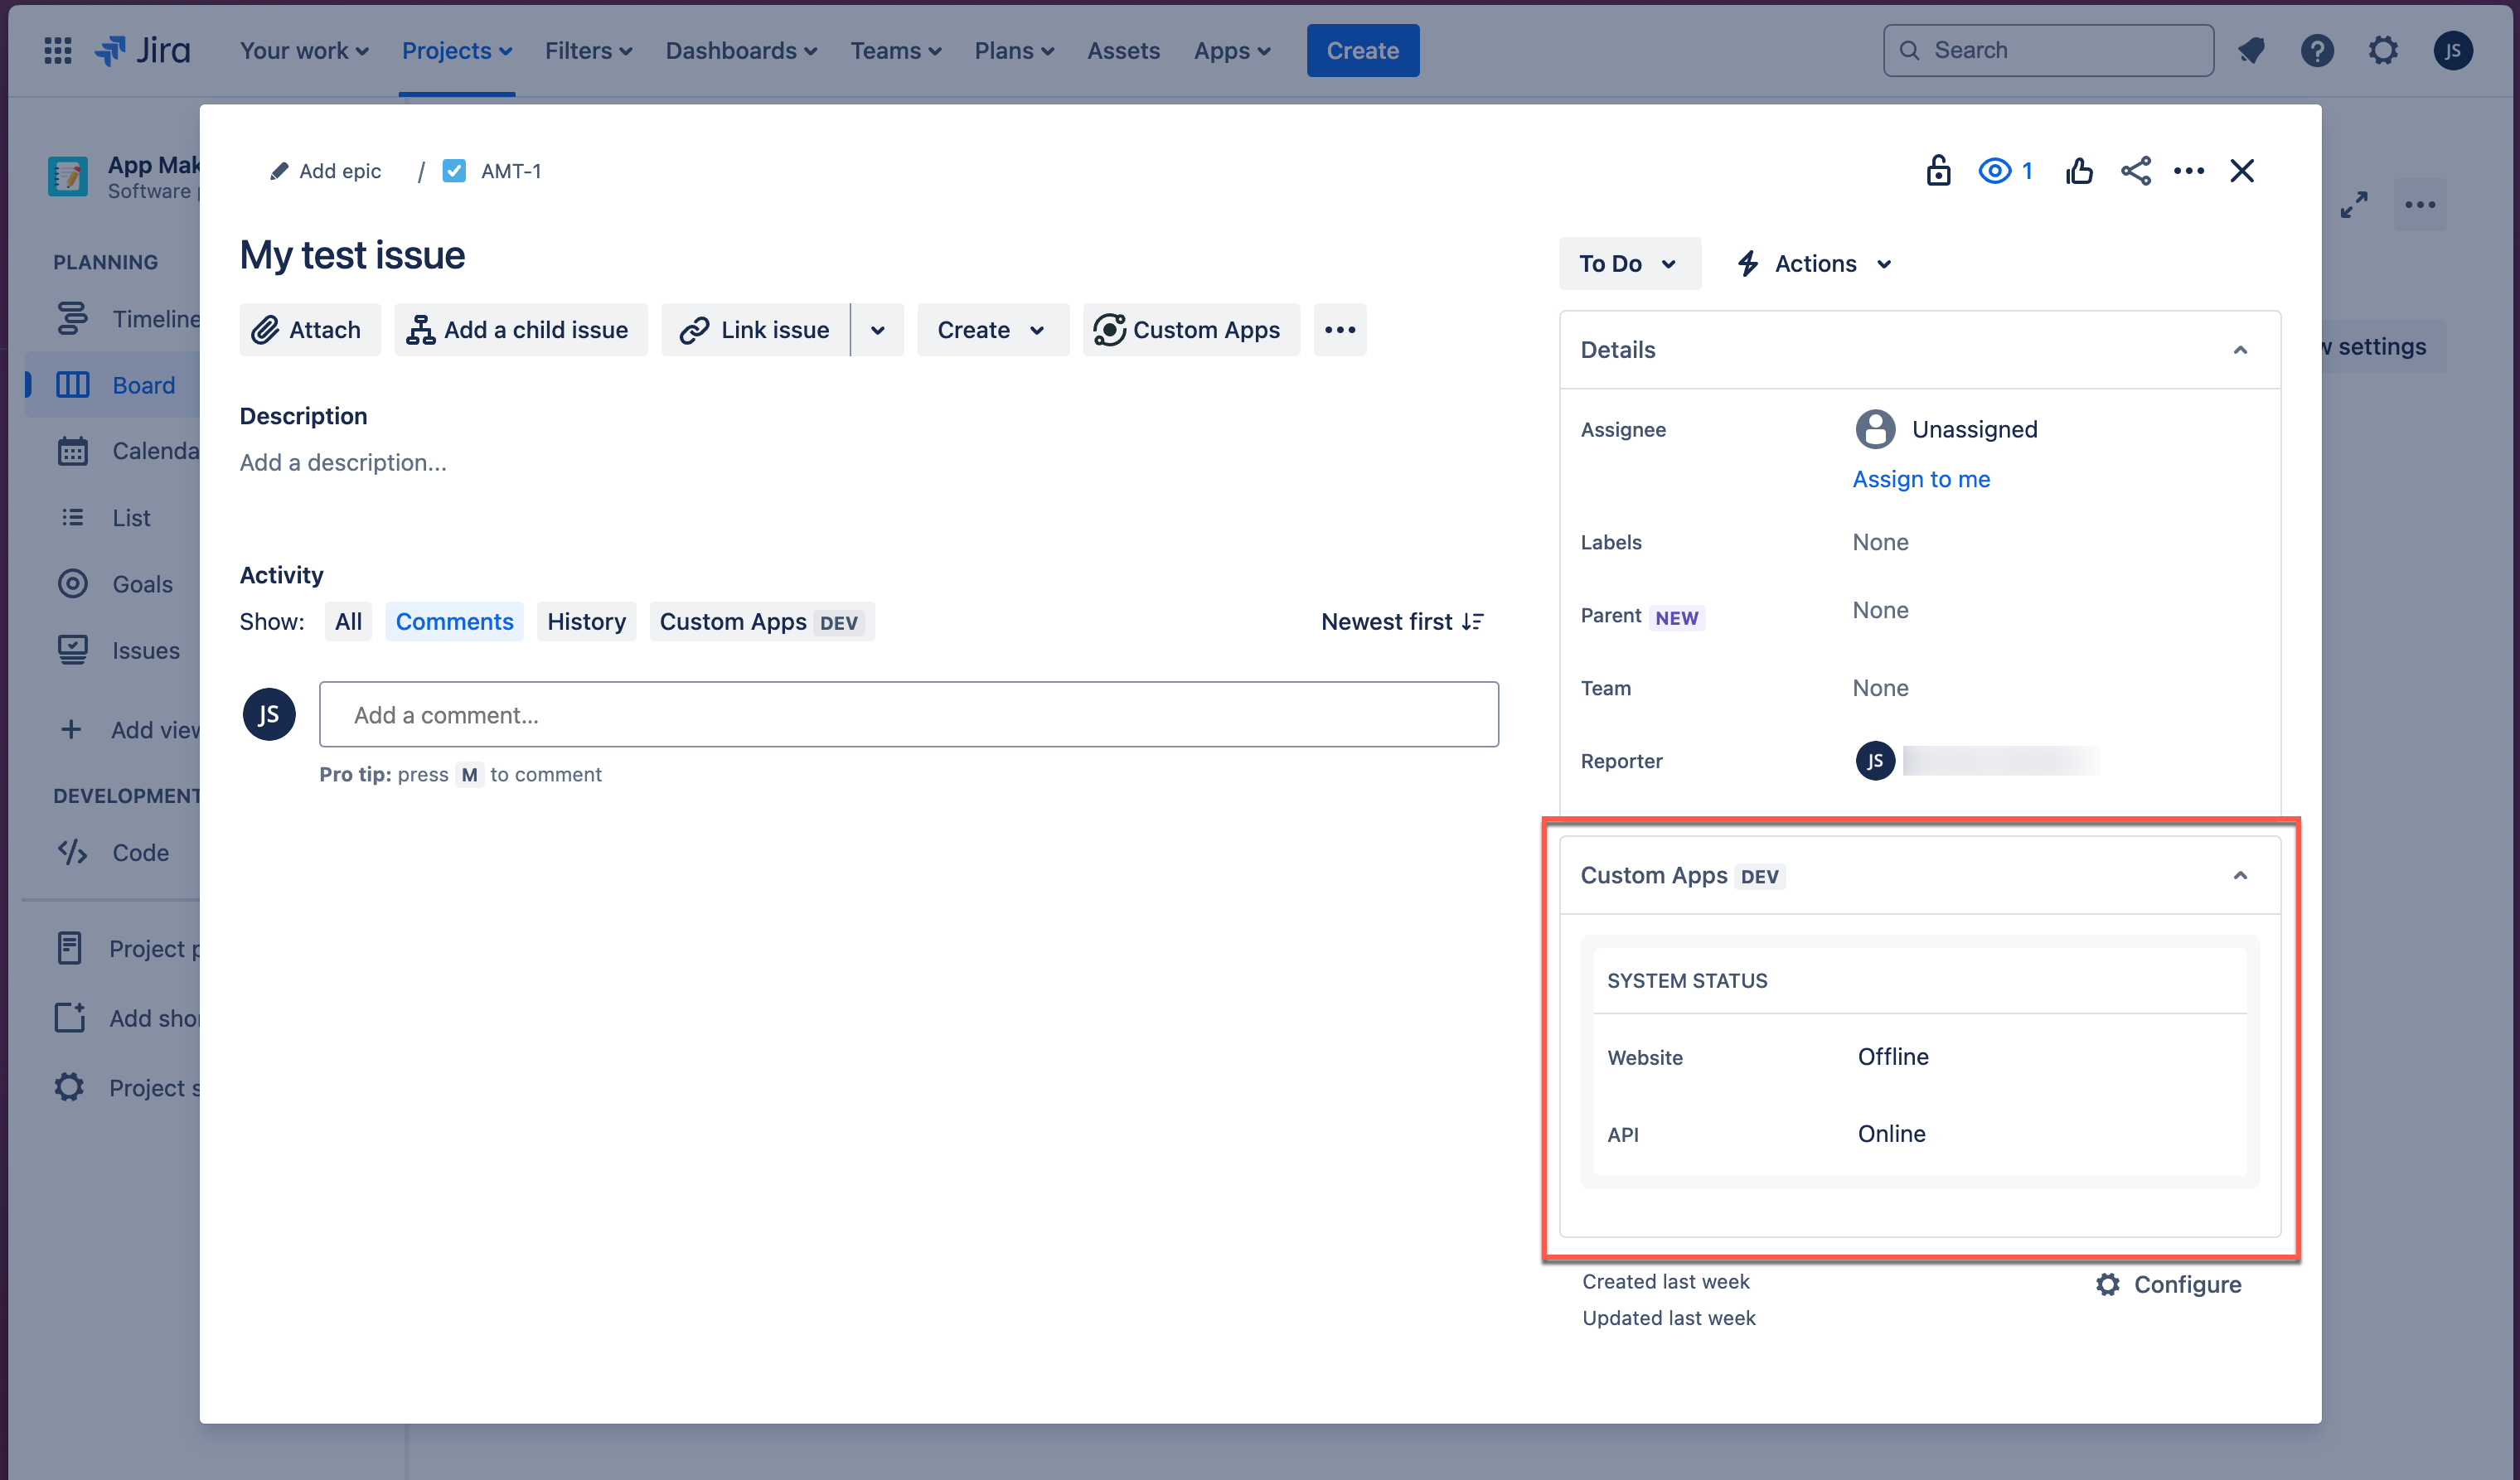
Populating a System Status Widget.
- Before you can test your Webhook Transform, we need to create a System Status widget similar to the one we created in the advanced dynamic content guide.
- In that widget, we read the system status values from a Data Object stored at the
"site"level, but this Webhook Transform has been setup to store its Data Object at the"project"level, so we'll need to change the template paths in the widget to read the data from the correct location.
- In that widget, we read the system status values from a Data Object stored at the
- Go back to the "UI Components" tab in the App Admin page in your Jira site, and create a new UI Component using the JSON below.
- If you still have the System Status widget from the previous guide, you can edit it to use the new template paths instead.
System Status Widget UI Component JSON
json
{
  "resourceType": "site",
  "module": "jira:issueContext",
  "title": "system_status_widget",
  "action": "set",
  "componentData": {
    "type": "StackedInformationGroup",
    "title": "System Status",
    "children": [
      {
        "type": "FieldValue",
        "key": "Website",
        "value": "{{dataObjects.project.system_status.website}}"
      },
      {
        "type": "FieldValue",
        "key": "API",
        "value": "{{dataObjects.project.system_status.api}}"
      }
    ]
  }
}- All we changed compared to the previous guide was the template paths in the two field values, swapping from:
dataObjects.site.system_status.websitetodataObjects.project.system_status.websitedataObjects.site.system_status.apitodataObjects.project.system_status.api
- This means the System Status widget will read the Data Object scoped to whatever project it is rendering in the context of, instead of the one global Data Object at the site level.
Executing the Webhook Transform:
- Now that you have the Webhook Transform created, you can test it by sending a POST request to the URL you copied from the Webhook Transform list with the payload you used in the example above.
- Open up an HTTP Client like HTTPie and create a new POST request to the URL you copied from the Webhook Transform list.
Heads Up
Because this Webhook Transform is scoping the data it creates to a specific project, you will need to get the key of the project you are using for testing in Jira, and include it in the request you make to the transform URL.
Include
&project={your project key here}in the URL as a query parameter by adding&project={your project key here}to the end of the URL copied from the Webhook Transform list.e.g.
https://my-atlassian-site.net/x1/BpLFQ48gmyljc6dS16_map5hPWA?path=webhook-transform&title=my-first-webhook-transform&project=ABC
- Then add the JSON below to the body of the request and hit send.
POST Request Body
json
{
  "event": {
    "status-checks": {
      "website": "Offline",
      "api": "Online"
    }
  }
}
- You will see in the response from the Webhook Transform, the Data Object that was created by transforming the webhook payload.
- Now navigate back to an issue in your Jira project and take a look at the System Status widget, you should now see the values updated to reflect the most recent request.
Updated System Status Widget
Next Steps
- Congratulations! You've successfully created a Webhook Transform in App Maker that can receive webhooks from an external system, translate the data from those webhooks into a Data Object, and store it in your Jira site.
- You've learned how to scope Data Objects to particular Jira projects, meaning you can now store data from multiple external systems in the same Jira site without it getting mixed up.
- You've also updated your System Status widget to consume that Data Object and display it in your Jira project.
- Data Objects solve the situation where you have a "one-to-one" relationship between resources in your Jira instance and data you want to store
- e.g. For your single Jira site, you might have a single Data Object that stores a large blob of context data about your company.
- But what if you have a "one-to-many" relationship between resources in your Jira instance and data you want to store?
- e.g. For a project in Jira used to track in-progress deal flows, you want to have a list of new sales opportunities populated from your CRM or contact form.
- This is where Data Lists come in, and we'll cover them in the next section.